
All about sewing machine needles
I regularly receive questions from students during the sewing class Which needles are handy to have at home? What do the numbers on the box of needles mean? Which needle do I need for which fabric? And how do you store the needles neatly?
In this blog, I will answer these questions and more. Any experienced seamstress or seamstress has their own preferences, of course, and there is also a big difference whether you are quilting, for example, or sewing clothes. I n this blog I concentrate on sewing clothes and accessories.
What do the numbers on sewing machine needles mean?
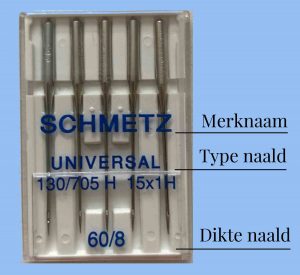
If you manage to read the numbers well above the needles you will often see codes like: Schmetz 80/12 or Organ 75/11 and then there is often another code on the box like 130/705 H. Here comes the explanation;
Brand name: Schmetz or Organ is the manufacturer’s brand.
Type of needle: Needle name ( in this example Universal) So you have many different types of needles. It depends on your choice of fabric which type of needle you use.
Sometimes there is a letter after the numbers of the type of needle, for example, an H, or SUK. This means the shape of the needle tip. For example, a needle for jersey fabric has a medium ball point.
The numbers on the box 130/705H You will find these numbers on every box and this is the indication of the needle type. H’ stands for Hohlkehle in German; flat shank. Flat shank needles are used for all brands of household sewing machines. If the code WH is indicated, the needle is completely round at the top. These are used for industrial sewing machines or some brands of overlock machines.
At the very bottom of the box you can also see numbers. The first number “60” = 0.6 mm and indicates the thickness of the needle in the EU (metric system) . The second number “8” means the same but in the imperial system used in the USA.
Tips & tricks
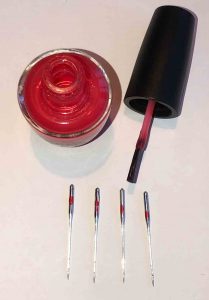
Marking; each brand of sewing machine needles works with its own color system. I would say enjoy making your own system. Grab a few jars of nail polish from the cabinet and give all universal needles the color blue, all stretch needles the color yellow and so on.
Replacement: with the Schmetz brand, they state that your needle should be replaced after 8 hours of use. Remains tricky because of course you never keep track of that. I don’t. I replace my needle as soon as I see that my stitches are no longer pretty while I am sure I have the right needle for the right fabric. Often the nail polish indication is half off by then too, also helps with a la
Marie Kondo say thank you and get rid of it.
the thinner the fabric the thinner the needle thickness.
Ok now you know how to read the numbers. Below I will continue on which type of needle to use for which fabric. Each type of needle is also available in different thicknesses. For all types of needles applies, look carefully at the thickness of your fabric the thinner the fabric the thinner the needle thickness.
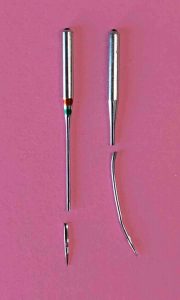
Characteristics wrong needle choice
You choose the right sewing machine needle according to the fabric. The goal is for your needle to go through the fabric as smoothly as possible without damaging the fabric or skipping stitches. This is because each needle has a different tip shape, thickness & shape of the eye through which the thread passes.
Once you chose the wrong needle then;
– Can damage your fabric, think of pantyhose where those ladders shoot into them, you sometimes see that with fabrics too.
– Breaks your thread all the time.
– Does your machine skip stitches. First thought is often; “” ok, wrong thread “” But it can also just be the wrong needle.
Sewing machine needles storage booklet homemade
All those loose boxes are sometimes a bit clumsy. With a piece of felt, elastic and textile glue you can make this handy folder, in which you can keep your beautiful collection of sewing machine needles neatly organized. The folder is as big as an A5 size, so it fits easily between the pattern sheets in the closet.
At the very bottom of this blog you will find the work description with step by step photos to make this folder yourself.
Universal needle
Fabric: Cotton, Linen, Canvas, Flannel, Poplin, Fleece.
Thickness: 70/80/90/100
Needle tip: slightly rounded.
Once there is no stretch in the fabric, this is an appropriate needle. Look carefully at the thickness of your fabric. The thinner the fabric the thinner needle thickness you use.
Stretch needle
fabric: jersey, punta di Milano, lycra, knit fabrics, jogging fabric.
Thickness: 65/75/90
Needle tip: medium ball point.
Once a fabric does contain stretch then this is a suitable needle, the rounded point and the special eye of the needle do not damage the threads of your fabric and you have less likely that the fabric is pulled into the bobbin case. For thin stretch fabrics use a thickness 65, for the slightly firmer stretch fabrics such as Punta di Milano use a thickness 75 and for jogging a thickness of 90.
Microtex needle
Fabric: Thin fragile fabrics; silk, organza, micro fiber, lining fabrics and sequin fabric.
Thickness: 60/70/80
Needle tip: pointed slender tip.
You may have experienced that you are processing a thin fabric and a “ladder” shoots through the needle into the fabric. This is a fabric that cries out for a microtex needle. It cuts through the fabric, so to speak, and is therefore very suitable for the thin fragile fabrics.
Jeans needle
Fabric: Thick stiff fabrics, denim, canvas, faux leather.
Thickness: 90/100
Needle tip: medium bullet point.
The name says it all. The reinforced shaft makes this needle extremely suitable for sewing stiff denim fabrics, among other things. The large eye also makes this needle suitable for thicker decorative thread such as topstitching thread for jeans.
Leather needle
Fabric: leather, suede, nappa, faux leather and fur.
Thickness: 80/90/100
Needle tip: LL (left cutting leather tip) .
Due to the cutting tip, this needle is not suitable for textiles but very nice in leather. Also suitable again for the thicker decorative yarn
Twin needle stretch & universal
Fabric: stretch or other.
Thickness: 70/80/90/100
Needle spacing: 1.6/2.0/2.5/3.0/4.0/6.0/8.0
Needle point: medium ball point.
As you can see, there are many different twin needles in terms of thickness and also in terms of needle spacing. It is especially important to use a stretch twin needle for a fabric with stretch, otherwise it is guaranteed to skip stitches. For fabrics without stretch, use a universal twin needle.
The needle tooth is personal. I stock three packs of twin needles as standard;
1. The 4.0 stretch twin needle. I like this spacing for topstitching shirts.
2. The 2.0 stretch twin needle. I use this for children’s clothing. the narrower needle spacing makes the twin stitching firmer and less likely to come undone.
3. The 4.0 jeans twin needle. Gives an even stitch immediately when making jeans and can be used with the thicker decorative thread.
Super universal needle
fabric: adhesive velcro, adhesive embroidery fleece, fabric attached with textile glue.
Thickness: 80
Needle tip: Slightly rounded tip.
Sometimes you use this needle 2x a week and sometimes not for months. But it makes you happy because because of the non-stick coating on the shaft, the special eye and cut-out shape. So you can sew those adhesives where with every other needle the thread breaks, stitches are skipped or you see such a thick accumulated adhesive on the needle.

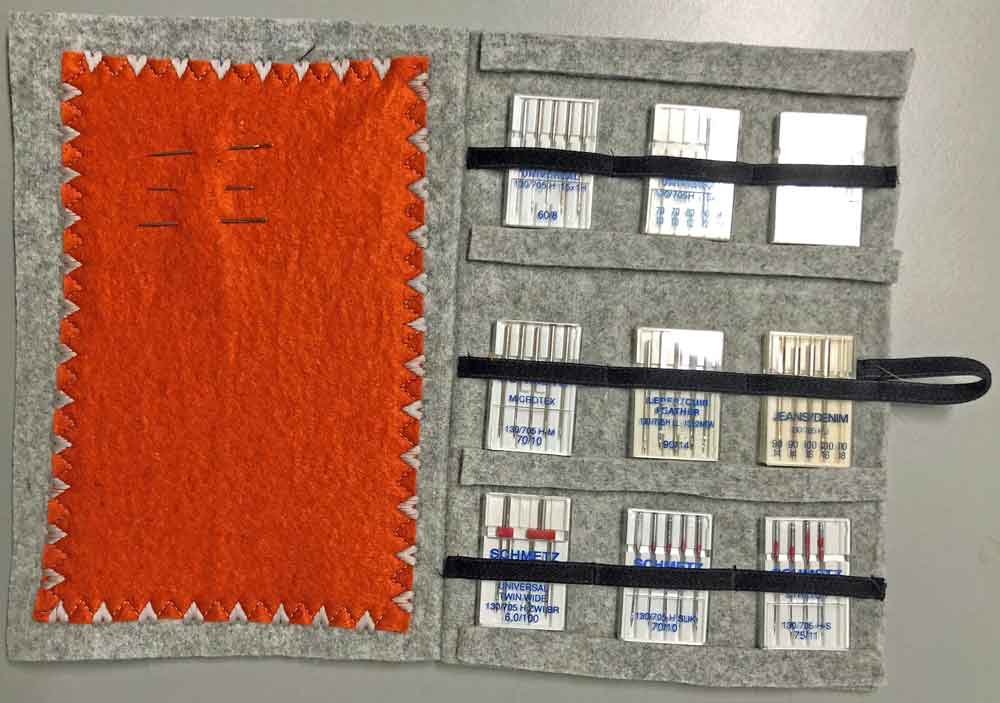
Storing sewing machine needles
A sewing machine storage booklet is a handy way to neatly and clearly organize and store your sewing machine needles. In handy A5 size and space for 9 boxes of sewing machine needles.
Supplies: felt 4 mm thick, felt 1 mmm thick (hobby felt) elastic 4 mm wide, sewing machine thread, textile glue, 1x button, ruler, fabric crayon.
1. You cut a square of 30 wide x 21 cm high from the felt of 4 mm thick and cut from the remaining felt of 4 mm thick four strips of 1 cm wide x 14 cm long.
2. You cut from the 1 mm thick felt a square 12 cm wide and 19 cm high.

3. Fold the felt in half lengthwise (you now have an A5 size) and stitch right along the fold edge with a small stitch through both layers of felt.

4. Stitch the thin 1 mm felt on the left side of the storage booklet with a fun decorative stitch all around.
Divide the right side of the storage booklet into sigments start at the top with a horizontal line at 0.75 cm, then two lines spaced 6.5 cm apart and end again with a final horizontal line at 0.75 cm.

5. Glue the four strips on the indicated chalk line with textile glue.
Pin the elastic in the center of the three sigments. Using a small straight stitch on your sewing machine, sew the elastic to the left side of the elastic, then twice at 4.5 cm from the edge and finish at the far right side of the elastic.
For the second row, on the right side of the booklet, fold the elastic back a bit so that a loop is created. The size of the loop depends on the size of your knot. Test if the loop falls nicely around the button (which we will sew to the front of the booklet in a moment) before sewing the loop in place.

6. Sew the button in the center on the front of the booklet and, if necessary, decorate the front of the sewing machine storage booklet with scraps of felt.

7. Organize your sewing machine needles storage booklet with the boxes. On the left side of the booklet you can keep the loose stray needles.
Enjoy your little book!
I love to see how you made or decorated your booklet. If you post it on social media would you tag me? @sewingstudio6 #sewingmachinebooklet #sewingstudio6
Thank you!
0 Comments